We’re kicking off March — National Nutrition Month® — with a variety of cooking ideas for your camping trip.
We’re weekend warriors when it comes to camping. Unless we’re taking a last-minute trip or have a busy week leading up to our departure, we usually cook and freeze our dinners ahead of time. We don’t really alter from our routine at-home meals in the camper, and there is always one meal that makes an appearance on every trip. If we do cook in the camper, we like to keep it simple and stick to five ingredients or less. Below we’re sharing a few faves that I think qualify as fairly healthy and are meant to be for campers where refrigeration is not an issue.
Breakfast
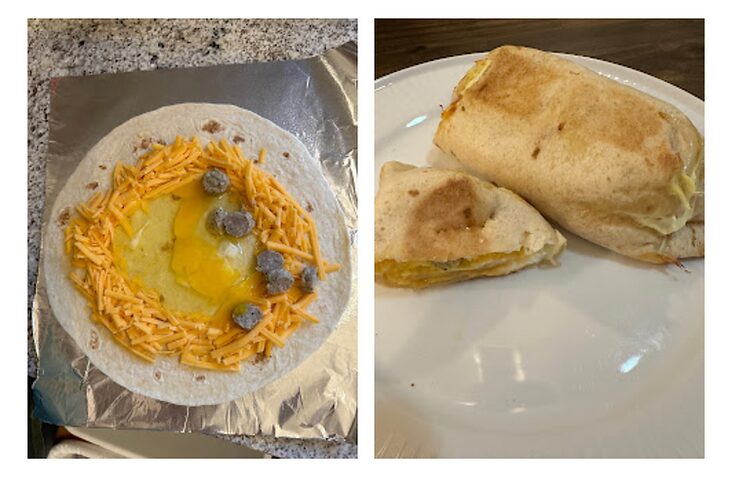
Breakfast Pockets
This is the meal I mentioned above that we take on every trip. It’s so simple to prepare and either cook ahead and freeze to reheat on the grill or over the campfire.
Ingredients
- 2 large soft tortillas or wraps of your choice
- Chicken apple sausage or meat of your choice—1 link per tortilla.
- ½ – 1/3 cup (or just eyeball it) shredded cheddar cheese (or cheese of your choice)
- 6 eggs
- Preheat oven to 380 degrees F.
- Place 2 pieces of foil down and spray with a cooking spray.
- Place one tortilla/wrap on foil.
- Place the cheese on the tortilla in a circle to form a ring.
- Crack two egg whites and one whole egg into the center of the cheese ring.
- Chop up your sausage and distribute the chopped pieces evenly across the tortilla.
- Fold the bottom and top edges of the tortilla/wrap in, then the left and right side to form a package. Then wrap the foil around the package.
- Place on a baking tray, being careful not to turn the tortilla/wrap upside down (or the egg will leak).
- Bake for 18 minutes, then flip the foil packets over and bake for 18 more minutes. You can poke the tortilla to see if you can feel the dome shape of the cooked yolk.
- Let cool.
Recipe Notes
- We eat this every.single.week at home for dinner. We love it. When we make this ahead for a camping trip, we instead scramble the eggs, but the concept is the same. We do this because cooked egg white can get rubbery. When everything is cooled down, we put the tortillas into a large freezer bag and throw them into the freezer for our trip. If you have a better method for freezing these please use your own discretion. This is just what works for us.
- How to reheat at the campsite: Once these thaw out at the campsite, we reheat them using our portable propane grill, but you could also try heating them up over a campfire. No matter what method you use to reheat them keep a close eye on them as the tortilla can overcook and burn if left too long.
- We use La Banderita large tortillas.
- When we first started making these, we used ham, but you can use whatever meat you prefer. We have also made them with bacon and chopped new potatoes mixed in.
- You can add any other ingredients you like. Some ideas are spinach, onions, bell peppers, seasoning—the possibilities are endless. Did I mention already we like to keep things simple? It’s important to mention that you don’t want to overfill the pocket or it might fall apart when you try to wrap it up.
- We like to garnish ours with hot sauce upon serving.
Lunch
Veggie Pita
Ingredients
- Pre-packaged broccoli cole slaw
- 1 large tomato, sliced
- 1 cucumber, sliced thin
- Whole grain pita bread
- Dressing ideas: You can choose your mayo of choice or mix the slaw with hummus.
- Optional: Pickled or fresh jalapenos, finely chopped
Instructions
- Mix the slaw, dressing and jalapenos in a medium bowl.
- Fill each pita with tomato slices and the slaw mixture.

Dinner
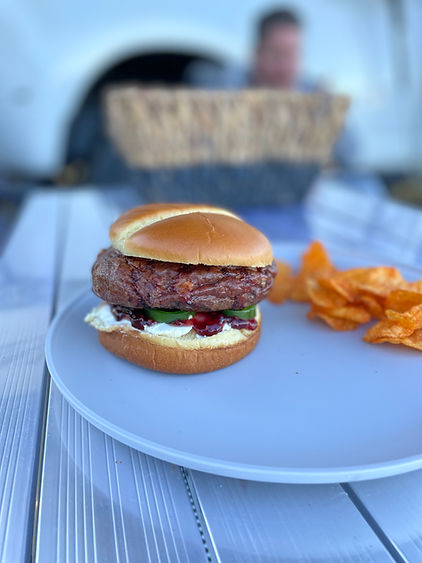
Bison Burgers
Former vegans here sharing a burger recipe. When we drove 1,800 miles across the country to visit family, we stopped at a restaurant near the Badlands. We loved the burger from there so much that we created our own copycat recipe and have made it several times at home and while camping. I’m sharing the recipe below and I promise you, you need this burger in your life!
Ingredients
- Bison meat (or meat of your choice)
- Fresh, sliced jalapeño (remove the seeds if you prefer)
- Low-fat cream cheese, to taste (optional)
- Raspberry jam, to taste (optional)
- Whole grain buns (or any bun will do)
Instructions
- Set out the cream cheese to give it time to soften so it will be easier to spread on your bun.
- Cook your burger meat. We cook ours on a portable propane grill, but you could cook it in a skillet or over the campfire.
- While your meat is cooking, slice your jalapeño.
- To assemble the burger, layer the cream cheese, jam, burger and jalapeño.
Recipe Notes
- For a vegan option, I’d like to give these a try with a black bean burger rather than beef.
- For a meat lovers version, buy a pre-made patty that contains bacon and cheddar. You’ll think you’ve died and gone to heaven.
Dessert
One of our vices at home is what we call an M&M suicide bowl. We’ll buy a few different flavors, mix them in a bowl, and have that for an after-dinner snack. We don’t bake a lot or keep dessert in the house because honestly I have no willpower and cannot be trusted with chocolate. So, I did a little bit of research to find some bake ahead, healthy desserts that might keep while hiking nor sitting around the campsite. These No Bake Almond Butter Chocolate Oatmeal Squares look delicious.
Snack
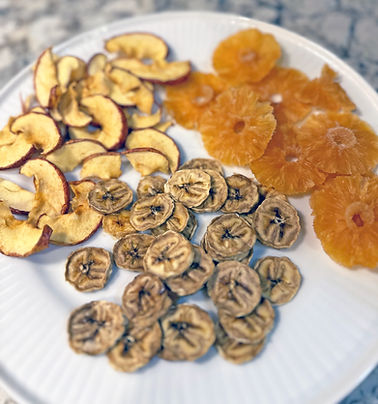
Dehydrated Fruit
We recently noticed that our Ninja Foodie has a dehydrate setting. I can’t tell you how long we have been using this cooker without thinking about using this feature, but now we’re hooked.
So far, we have only made dehydrated fruit, but we plan to give more things a try for future backpacking camping trips. We found this video, followed his advice, and were happy with the outcome. Here’s what we did:
Ingredients
- Bananas: Cut bananas into ¼ inch rounds.
- Pineapple: We like to dehydrate pineapple rings rather than chunks. If you use canned pineapple rings, drain the juice.
- Apples: Wash and peel if desired. Remove the seeds and core, then slice into ¼-1/2 inch rings. Thinner rings will crisp more. Coat your rings with lemon juice, or you can use the leftover pineapple juice if you’re dehydrating canned pineapple at the same time.
Instructions
- Lightly spray your dehydrator trays with spray or oil.
- Arrange fruit slices in a single layer on dehydrator trays. Leave enough space between pieces to ensure air flow.
- Set the Ninja Foodie temperature to Dehydrator mode and a temperature of 135 degrees Fahrenheit.
- Set the timer for 10 hours.
Recipe Notes
- Let the fruit cool completely before storing.
- The fruit will not be hard and crispy like it would be if you purchased it from the grocery store, where dehydrated fruit is typically also fried.
- For short-term storage, you can store your fruit in a sealed bag or container on the counter or in the pantry.
- For long-term storage, store them in a transparent airtight contained on the counter. Check for signs of moisture, and if you see any, put them back into the dehydrator for a bit to dry them out. Shake them occasionally to keep them from sticking to each other. After your fruit has conditioned, you can store them in an airtight container or vacuum seal them, then store them in a cool, dark place.
- You can research and find a range of cooking times for dehydrating individual fruit, but it also helps to rely on the feel/texture. For example, if you squeeze or tear your fruit after it cools and it shows any sign of moisture it needs more drying time.
- Expert tip: Have floss ready after you eat your fruit!
Some of our cooking equipment
- Instant Pot
- Vacuum sealer
- Vacuum sealer bags
- Dehydrator trays
- Food grade oxygen absorbers
- Propane grill
- Quick connect propane hose
- Outdoor compact folding table
- Instant Pot cookbook
- Electric griddle
When you buy something we recommend on Amazon, we may get an affiliate commission, but that doesn’t affect your price.